Sunday, November 30, 2008
Nightstand Saga I
Hello.
This is installment 1 of me going in to excruciating detail about making matching nightstands. If you do not appreciate anecdotes about my private carpentry projects, I hear YouTube has some good stuff.
Anyway, Nightstands. I have already planned what it will look like, after looking at some models online.
The next step was selecting the wood. My dad has some cherry, oak, and black walnut that he said he would let me use. Normally, selecting the black walnut would have been a no-brainer, due to it's complex and deep grain, but it didn't really match my other bedroom peices, my bed and lingerie dresser in color (they are white walnut). I ultimately decided to use it regardless of the fact that it will be much darker then my white walnut pieces, simply because it is so darn beautiful (click on pics below)!
I worked for the better part of Friday, Saturday, and Sunday morning selecting the wood, and cutting out oversized blanks for what will become the crucial pieces of the nightstands.
I started out with the widest boards for the table-tops. I went ahead and glued them up and put them aside.
I then started to make the side panels (again, see this link for what the piece will look like).
Here is what some of them look like dry-fitted together, but without the center panel.

Here are two. the one on the right is partially disassembled so you can see the construction type.

On this piece, I decided to make the rails and styles (the horizontal and vertical boards) mate using a mortise and tenon joint.
I am pretty sure that this was overkill for this type of joint and normally I would not have done it this way, but I wanted to try a new joint type on this piece. Also, for those of you who speak carpentry, because this piece has legs, I have to do a blind-dato, and I also didn't know how to square-off my dato where my bottom style was.
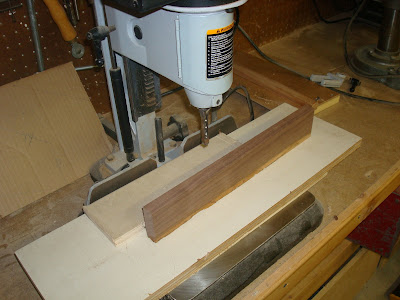
It required the use of a mortising chisel, which is like a drill press with a square chisel surrounding the drill bit.
I have never used one, but I have seen Norm do it, and it was pretty simple.
here it is in action:
far


This is installment 1 of me going in to excruciating detail about making matching nightstands. If you do not appreciate anecdotes about my private carpentry projects, I hear YouTube has some good stuff.
Anyway, Nightstands. I have already planned what it will look like, after looking at some models online.
The next step was selecting the wood. My dad has some cherry, oak, and black walnut that he said he would let me use. Normally, selecting the black walnut would have been a no-brainer, due to it's complex and deep grain, but it didn't really match my other bedroom peices, my bed and lingerie dresser in color (they are white walnut). I ultimately decided to use it regardless of the fact that it will be much darker then my white walnut pieces, simply because it is so darn beautiful (click on pics below)!
I worked for the better part of Friday, Saturday, and Sunday morning selecting the wood, and cutting out oversized blanks for what will become the crucial pieces of the nightstands.
I started out with the widest boards for the table-tops. I went ahead and glued them up and put them aside.
I then started to make the side panels (again, see this link for what the piece will look like).
Here is what some of them look like dry-fitted together, but without the center panel.

Here are two. the one on the right is partially disassembled so you can see the construction type.

On this piece, I decided to make the rails and styles (the horizontal and vertical boards) mate using a mortise and tenon joint.
I am pretty sure that this was overkill for this type of joint and normally I would not have done it this way, but I wanted to try a new joint type on this piece. Also, for those of you who speak carpentry, because this piece has legs, I have to do a blind-dato, and I also didn't know how to square-off my dato where my bottom style was.
It required the use of a mortising chisel, which is like a drill press with a square chisel surrounding the drill bit.
I have never used one, but I have seen Norm do it, and it was pretty simple.
here it is in action:
far

near

That machine would make the mortise (the female part, on left below) and I would cut the tenon (the male part, on right below) by rebating the end of the wood with the table saw.

I hope to have these done by 2010. Things move slowly in the furniture business.
Sunday, November 16, 2008
Which Bedside Table Should I Make? UPDATED AGAIN!!!!
Hello there.
I plan on making 2 bedside tables this Thanksgiving and Christmas holiday.
As you can see in this ongoing post, which documents all of my furniture projects, I have already made 2 peices out of White Walnut: my head board, and a lingerie dresser for my wife.
I would like these to match those two peices as close as possible, in style, wood type, and finish, while also looking good by it's self. I found the following pictures on the www (which is my typical MO when making a new peice) and I plan to make one just like these. I'd like everyone's opinion, and you can vote for a number in the comments.
I will be using Black Walnut (my dad is out of White Walnut) and finishing to match my other two peices the best I can. Please don't consider the finish and wood type. If you need a reference, the 5th one looks most like the wood and finish I will be using. You'll notice these all look about the same. This is true. I picked them out because they look like the would match the lingerie dresser I already did. ( my next peice will probably be a chest-of-drawers to match everything!)
My opinions are in the comments.
1)

2)

3)

4)

5)

UPDATE***************************************************
Instead of working for about 2 hours today at work, I modeled up my vision for this peice, which I will put dimensions on at some point.
Thank you Google Sketch-up!
Here are some highlights showing the top detail and the overall peice:
bedside table 3d drawing


top left edge

UPDATE 2:
update 2, shows chamfered legs, thicker styles on the face frame, and pulls.

Labels: Furniture
Wednesday, November 12, 2008
new boots
hello.

Remember when I blogged about the Merrell boots I bought that I loved so much? (here is a reminder)
They crapped out.
On one hand, they lasted 2 years. On the other hand, they were $150. On some kind of third hand, my first pair are in prety good shape too.
WTF?
The sole cracked and detached from the rest of the boot on a small part.
The upshot is, I sent them to merrell, and they replaced them with a new pair of slightly less cool ones. I wasn't really stoked about that, but on the forth hand, I also have a brand new pair of boots. Sweet action. I just tried them on, and they are really kinda awesome.

This is one of my "life's little victories". booya.
Sunday, November 09, 2008
Finishing the basement ii
Hello.


In the picture above, you can see all of the plumbing we had to do. The good people who built this house took the effort to bury a stub for a tub drain. All it took was breaking up the concrete to get to it. They also put in a 4" stub, that came out of the floor for the toilet. When my dad and I did the pluming, we were sure there was no such thing as a 4" toilet flange (the thing that the toilet attaches to) , so we dug everything up and replaced it with 3". The little rag on the floor is where the toilet will go. The vanity will be on your left. I also had to run fresh water to the bathroom, which was probably a 2 day job. Finishing basements is tough work.
Finishing my basement has consumed me.
Literally. My basement has come to life, and takes bites out of me when I go down there. It is very difficult to make anything done this way.
Seriously, I wanted to update you guys on the progress. To be honest, the pictures you see below are about a month old, but I wanted to show a progression. I will post a more updated blog later.
This post brings us up-to-date on framing, electric, and plumbing. When I took these pictures I was almost ready for drywall. The layout of the basement includes a 1) "rec-room" that is about 500 sq ft, 2) a small/medium sized bedroom ( about the size of bedrooms in our second floor) , 3) a very large walk-in closet attached to the bedroom, 4) a mechanical room, that houses our furnace, water heater, etc, that has some extra storage space as well, and 5) a bathroom.
I wanted a bedroom down there so we can market this house as a five bedroom house (which should give us an edge on other houses around here). This means it must have a large window and a closet. Which it does. This space could obviously be used for other things, such as an office (I wired it with cable, phone, and the network in my house), or an excersize room. I think the window will brighten things up in these types of rooms where you might not want to spend alot of time.
Here is the layout (you might have to click on it to expand). The top of the picture is the front of the house.

The two pictures below show the same POV as the original post here. As you can see, those aren't very good pictures, due to there being walls right in front of the camara, but I didn't think about that when I took them the first time. They are marked with red arrows in the layout above.
bedroom looking toward back-right side of house.

inside bathroom looking towards linen closet. the bedroom is on the other side ofthe closet/shower you see.

You can also check out these pictures:
entering the bedroom, looking towards the back of the house.


All of the exterior walls are full-framed-up walls, meaning they are similar to the exterior walls on the first-floor of a house. This wasn't the cheapest way to do it, but it was the best way. It also allowed me to insulate the basement, which also was not cheap. Another benefit was that I could hide various things, like the 3" pipe you see in the right corner. My goal was to make the basement look like the living space on the first and second floors, and I these kind of considerations helped.
looking into the bathroom from the foot of the stairs.

In the picture above, you can see all of the plumbing we had to do. The good people who built this house took the effort to bury a stub for a tub drain. All it took was breaking up the concrete to get to it. They also put in a 4" stub, that came out of the floor for the toilet. When my dad and I did the pluming, we were sure there was no such thing as a 4" toilet flange (the thing that the toilet attaches to) , so we dug everything up and replaced it with 3". The little rag on the floor is where the toilet will go. The vanity will be on your left. I also had to run fresh water to the bathroom, which was probably a 2 day job. Finishing basements is tough work.
btw, I just explained the concept of food turning into poop to Alex. I think I blew her mind. She g ave me a blank look, and said "okay". I reemphasized, and she called me discusting.
Labels: Finishing basement
![]()